Radio Freedom DJ Help
Listener Help
DJ Help
How to use the Shoutcast DSP with Radio Freedom
Netcasting is simple. Unfortunately, Shoutcast's site doesn't provide very accurate information. This page will tell you how to set it up for Radio Freedom.
Overview
Shoutcast is a way to stream your music to the Internet. Shoutcast is made up of 2 parts.
-
Winamp or Otsjuke or whatever program you use
You'll need Winamp 2.72 or later or a program that uses the Shoutcast DSP -
The Shoutcast DSP Plug-in v.1.8.2
The plug in allows you to setup your broadcast settings.
Both are necessary to set up your broadcast. You can download the DSP here
Setting up the Shoutcast plug in
Before you set up any of this join our Chat Room where our staff will guide you through all of this.
The Shoutcast plug in must be installed into your Winamp/Otsjuke plugins directory. Once you've installed it there, you're ready to begin setting it up.
To launch the plug in, open winamp then press CTRL+P. This brings up the preferences window in Winamp.
Now, select the DSP menu item, and highlight Shoutcast Source DSP v1.8.2a
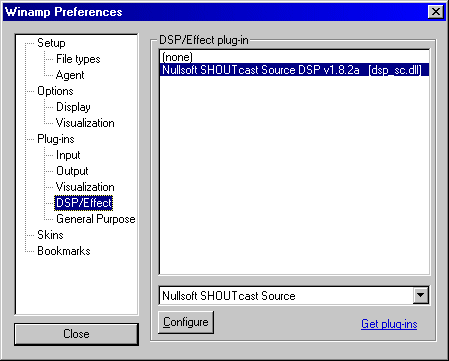
When you do this, the Shoutcast Control Panel Shows up.
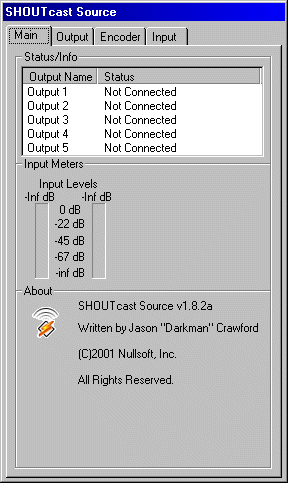
Once this window is up, you can close Winamp's preferences window.
Setting up your Shoutcast settings
The following table describes each of the Tabs on Shoutcast's Control Panel
The Encoder Tab.
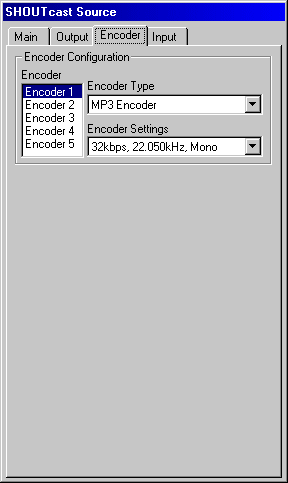
This is where you choose the encoder type and bit rate. First, select the Encoder. In this illustration, encoder 1 is selected.
Typically your
Encoder type = Mp3
Encoder settings = Output bit rate you decided upon (ask staff in chat room)
Note: These settings can not changed on the fly while casting without dropping the stream, it is not advisable because it will severely disrupt your stream.
The Input Settings
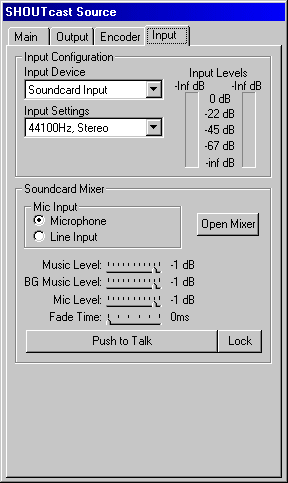
Select the Input Type. You can choose Winamp, or your soundcard input. You can use soundcard input if you play wav files over your songs. Also, you need to use Soundcard Input if you're using a microphone.
Now select you input Settings. This is typically 44100 Hz, stereo because most MP3s use this setting. I always use 44100 Hz, 192 bit MP3s.
Now, click the Open Mixer button. Windows volume control and recording control open. On the volume control, select Wave out and set it's output volume to maximum. Also, select your microphone, and set the volume slider to minimum.
On the Recording control, select Stereo Mixer as the device, and set the recording volume to maximum.
You can now test your microphone. Press the Push to Talk button on Shoutcast's Input tab, and check to see that your microphone is working.
The Output Tab
Connection settings
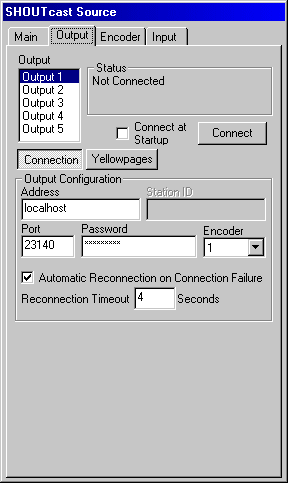
First, select (highlight) Output 1 in the list (as shown).
In the address box enter: this.is-radio-freedom.co.uk
In the Port box enter the port number assigned to you by our staff
In the Password box, enter the password you given to you by staff.
In the Encoder box, choose "1", the same number you used on the Encoder Tab.
Yellow Pages settings
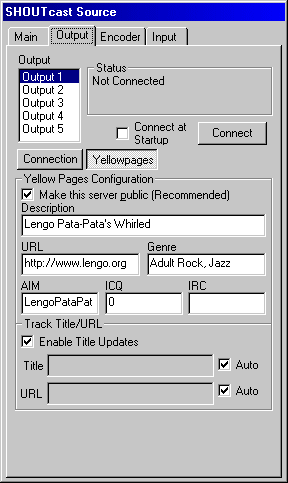
The Yellow Pages button allows you to tell Shoutcast's server your station description. All the fields here are self-explanatory. Enter your station's Description, The genres, your ICQ and/or AIM numbers, and check all the check boxes.
NOTE: Make sure all setting are correct BEFORE casting!!
You're now ready to rock and roll! Well, almost anyway. Go ahead and click the Connect button on the Output tab. Watch it stream!
Tips and Caveats
To make your life easier, run Windows Explorer on one half of your desktop. This makes it easy to drag and drop files into your winamp play list.
If you're using a mic, or using Soundcard Input on the Input tab, you'll have to disable all Windows sounds. You can do this by choosing Start/Settings/Control Panel/Sounds and make a profile that doesn't provide any sounds for Window's events. Also, if you're using AIM or ICQ, you'll want to disable all the sounds in that chat application.
When Netcasting, there will be at least a 20 second delay between what you hear and what your listeners here.
If you're going to play wave files over the top of MP3 files, disable the wav association in Winamp (press CTRL+P, go to file types, and unselect the .wav extension). Now when you double click a wave file, it will play in your media player, and since Soundcard Input is selected, they will be heard on your stream. However, I HIGHLY suggest you delete Windows Media Player 7 and use Window Media Player 2. Mediaplayer 2 uses far less memory and is much more responsive than Mediaplayer 7.
When you quit Netcasting, all the information is saved. You will not need
to enter the information again.To quit Netcasting, click the disconnect button on shoutcast's Output tab, then press CTRL+P to get to Winamp's preferences. Highlight the DSP option, then select 'none' in the right hand preferences pane. The Shoutcast control will disapear.
You're done. The next time you start a Netcast, all the info is already in your Shoutcast control panel.


